Slurring/doubling meter
Slurring/Doubling Measure Tool
When transferring a halftone dot from a plate to substrate various issues can occur: dot gain (dot spread), fill-in, sharpening, slurring, smearing, and doubling. First step is recognizing the problem is, and second step is performing the necessary steps to fix it. Measured Control strips assess if prints are good or bad, but typically they cannot indicate the exact nature of the problem.
There are many reasons for doubling/ slurring. Some of them are related to substate, ink, some due to environment conditions, but in most cases a mechanical press adjustment is required to fix the issue. Sometimes it is enough to wash blankets / inking units more often.
It is critically important to control press settings: inking and form rollers, printing and cylinder pressure (Please review NIP Control Products for more information). In many cases, the blanket may not be tight enough or too much ink may be being applied.
Visual slurring / doubling test:
exposed on plate printed on substrate

This is an example of doubling effect. To inspect, a magnifying glass should be used.
Slurring/Doubling Control Strip
![]()
Currently slurring / doubling measurement test form is intended to use with X-Rite™ i1Pro/ i1Pro2 instruments. To capture data, please use X-Rite™ ColorPort software. It can be downloaded free of charge from X-Rite.com webpage. Target XML for this purpose can be downloaded here. To capture data, i1 ruler helps to run scan mode.
Click on the icon below to download Test Form PDF and XML file for ColorPort (ZIPs):


Control Strip ColorPort Target
Procedure
1. Print Control Strip in different locations on the sheet depending on size; 2 – 8 strips can capture information from top, bottom, left and right size of the sheet.
2. Use I1 Pro /Pro2 Instrument /ColorPort software capture data. Load the "Slur-1.XML" file downloaded above into the "ColorPort_Resources/refs/CMYK" directory. Then launch ColorPort and this target will be an option in the Target pop up window. Measure the target and save.
To scan each form instrument has to be moved twice. First scan starts from the red triangle on the left up to thin black line in the middle of the form. Then second scan (red triangle with number 2) from the right side just to cross the same thin black line.

3. Login to your ChromaChecker account and select Slurring Meter Tool
4. Upload data to the ChromaChecker server - Upload Tab
5. Check the result.
Analysis
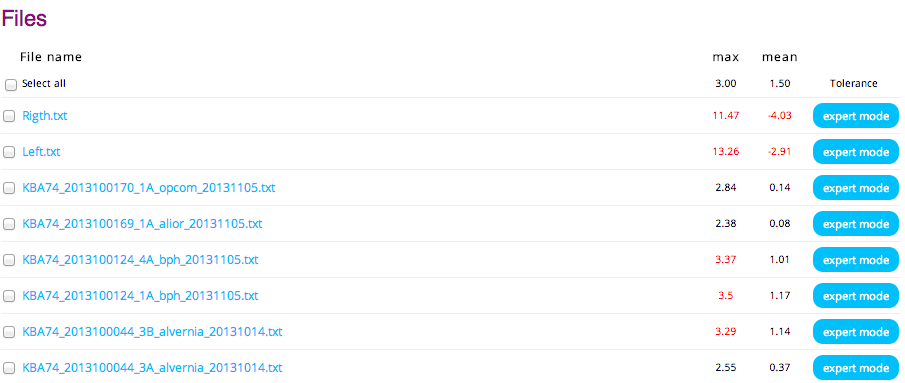
Uploaded file is analyzed and results are presented in a table. Two different modes are available: Easy Mode presenting max and average error and Expert mode, where detailed information helps to understand the issue. See the sample tables below:
Easy mode:
Expert mode:
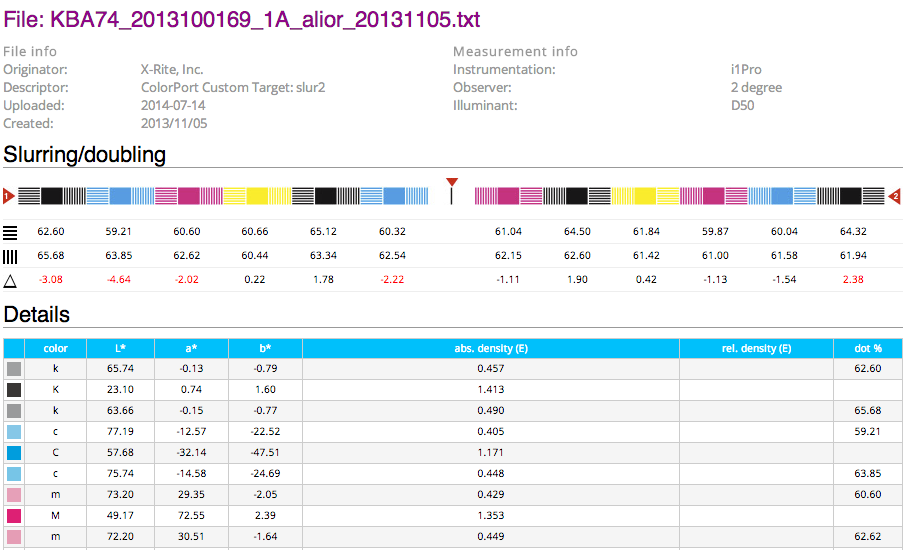
? - represent density difference of vertical and horizontal lines .
Ideally this value should be equal zero.
Additionally, second table lists all patch readings for detailed analysis. Both density and Lab values are presented.
Demo data
Here are few files for demonstration purpose. Download and save them, next upload to your account.

